Virtual Crop 4

As we continue right along with our February Scrappy Virtual Crop, we’ll creating a fun and very easy stacked circles scrapbook page in 4 steps next! We have been doing some harder challenges this weekend so far, so the next couple will be a little easier for you. At least, they were for me.
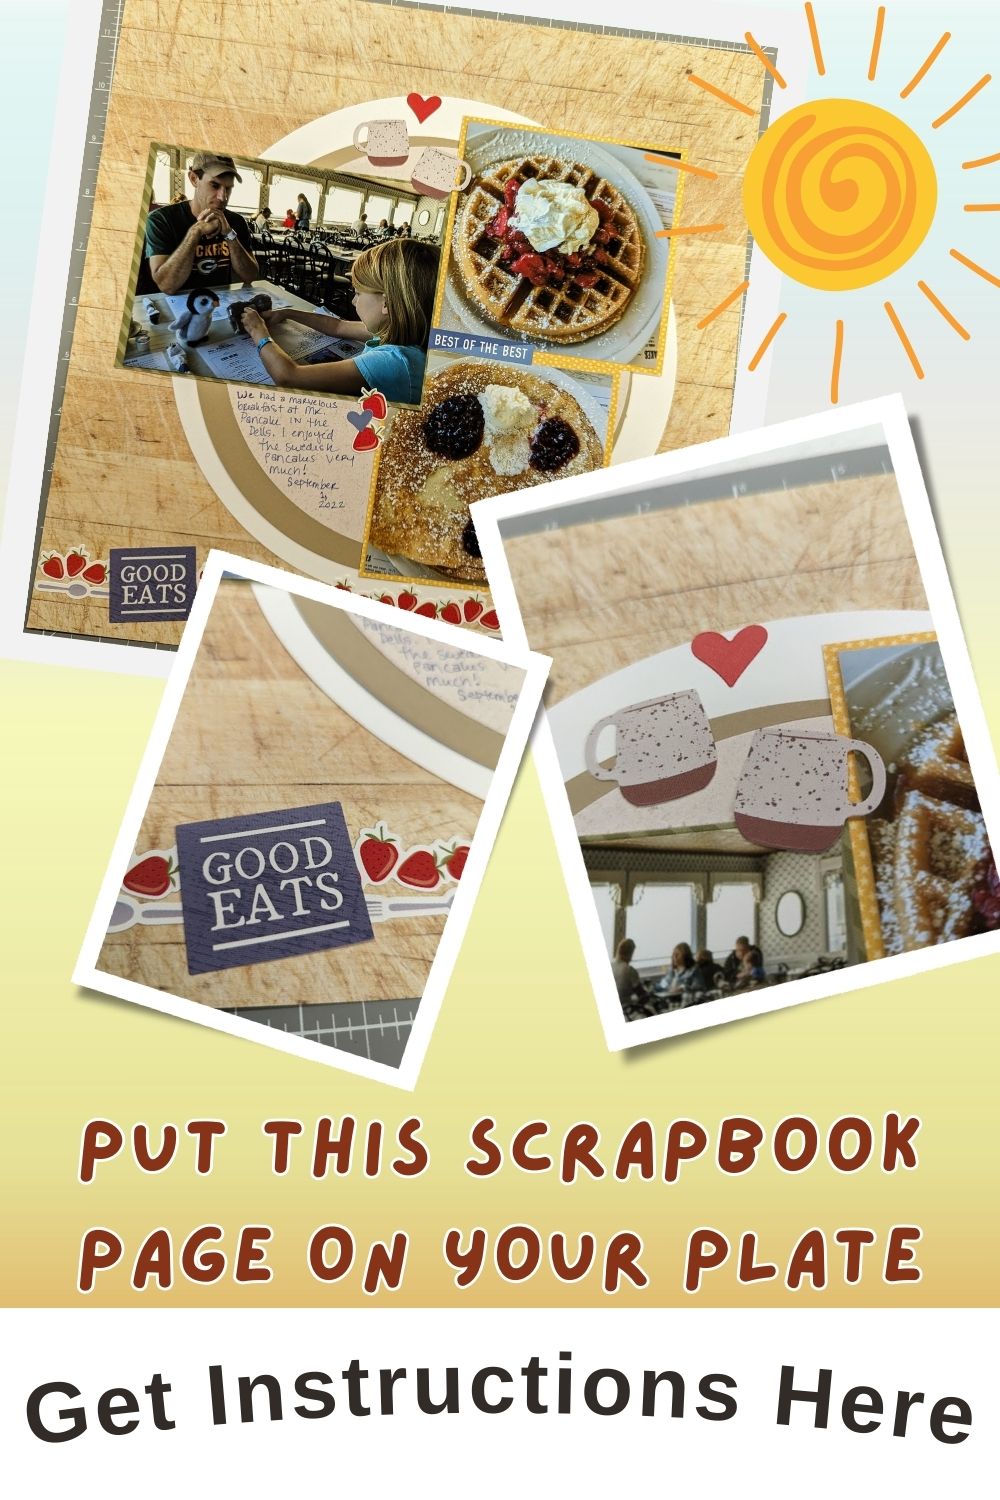
This sketch from the Creative Memories blog was perfect for our breakfast in the Wisconsin Dells at Mr. Pancake. This was one of our favorite meals of our vacation, so if you are in the area during season, give them a try for a wonderful breakfast.
What You Need:

To create this fun stacked circles scrapbook page in 4 steps, you will need a few things. Pick a 12×12 base to create your layout on, along with 2-3 different papers or cardstocks for your circles, and some other colors and designs for your photo mats. I used the back of some of my circle papers and some scraps for my mats.
I also used the adorable, limited edition Foodie stickers to embellish my page. Depending on your theme, you’ll want some coordinating embellishments as well to bring your page together.
In terms of tools, I highly recommend the Creative Memories Circle Cutter, as that is how my instructions are written originally. I also included the closest circles from the Custom Cutting System though, that can hopefully be helpful for you if that is the system you use instead.
You will want a 12 inch trimmer, adhesives, and your 13×13 cutting mat for cutting your shapes and lining things up.
Creating This Stacked Circles Scrapbook Page in 4 Steps

Step 1 – First, establish which paper you want to use for your base, and which others you want to use for your circles. Then, set your Circle Cutter to 10″ and cut the largest circle from the paper you chose for it. Then, set your Circle Cutter to 9.4″ and cut the medium circle from that paper you chose. Finally, set your Circle Cutter to 9″ and cut your final, smaller circle from your final paper choice.
If you are using the Custom Cutting System, use your Jumbo Circle and Largest Circle pattern in your trio of circle patterns. Cut your largest circle on the inside track of your Jumbo Circle with your Red Blade. Cut your middle sized circle on the inside track of your Jumbo Circle with your Blue Blade. Finally, cut your smallest circle from your largest circle in the trio of circle patterns with your Blue Blade. These sizes will not be the same as the instructions, as those are based on the Circle Cutter tool, but they are can work for your page anyways.
Step 2 – Adhere your circles onto the center of your base, stacking them how you would like. The original instructions and my page are offset a little bit, to give it the look of “stacked pancakes.”
Step 3 – Trim your photos to what works best for your photos, or per the instructions. The photos in the directions have 2 photos that are 3-3/4″x3-3/4″, and one that is 3-1/2″x 2-3/4″. Mine are obviously not those measurements, so I could fit what I had. Feel free to do what works for your photos. Mat them on some colors that help your photos pop. Adhere them to your layout.
Step 4 – Add a couple of borders or border stickers along the bottom of your page. You can use the Border Maker System or a border punch to create your borders as well. I stuck to the cute stickers I had with the Foodie stickers I had. Finish by adding some embellishments and journaling to your page.
Wrapping Up
I hope you love the page you create from the stacked circles scrapbook page in 4 steps challenge in our Virtual Crop! Remember to post a picture of your completed page to the challenge post in my Facebook Group by Thursday, February 29th at 11:59pm for your chance to win a prize! We have a lot of fun in that group, even outside of Virtual Crop weekends, so be sure to request to join!
If you don’t already have a Creative Memories Advisor, feel free to shop my link at the button below! I truly appreciate your support, and I truly love this company! Find out why here.
Download Instructions for This Layout Here:
Check out more tips and layouts here!


*This post contains affiliate links for products that I have used, loved, and want to share with you. If you click on those links, I may get a small commission at no additional cost to you.

