Virtual Crop 2

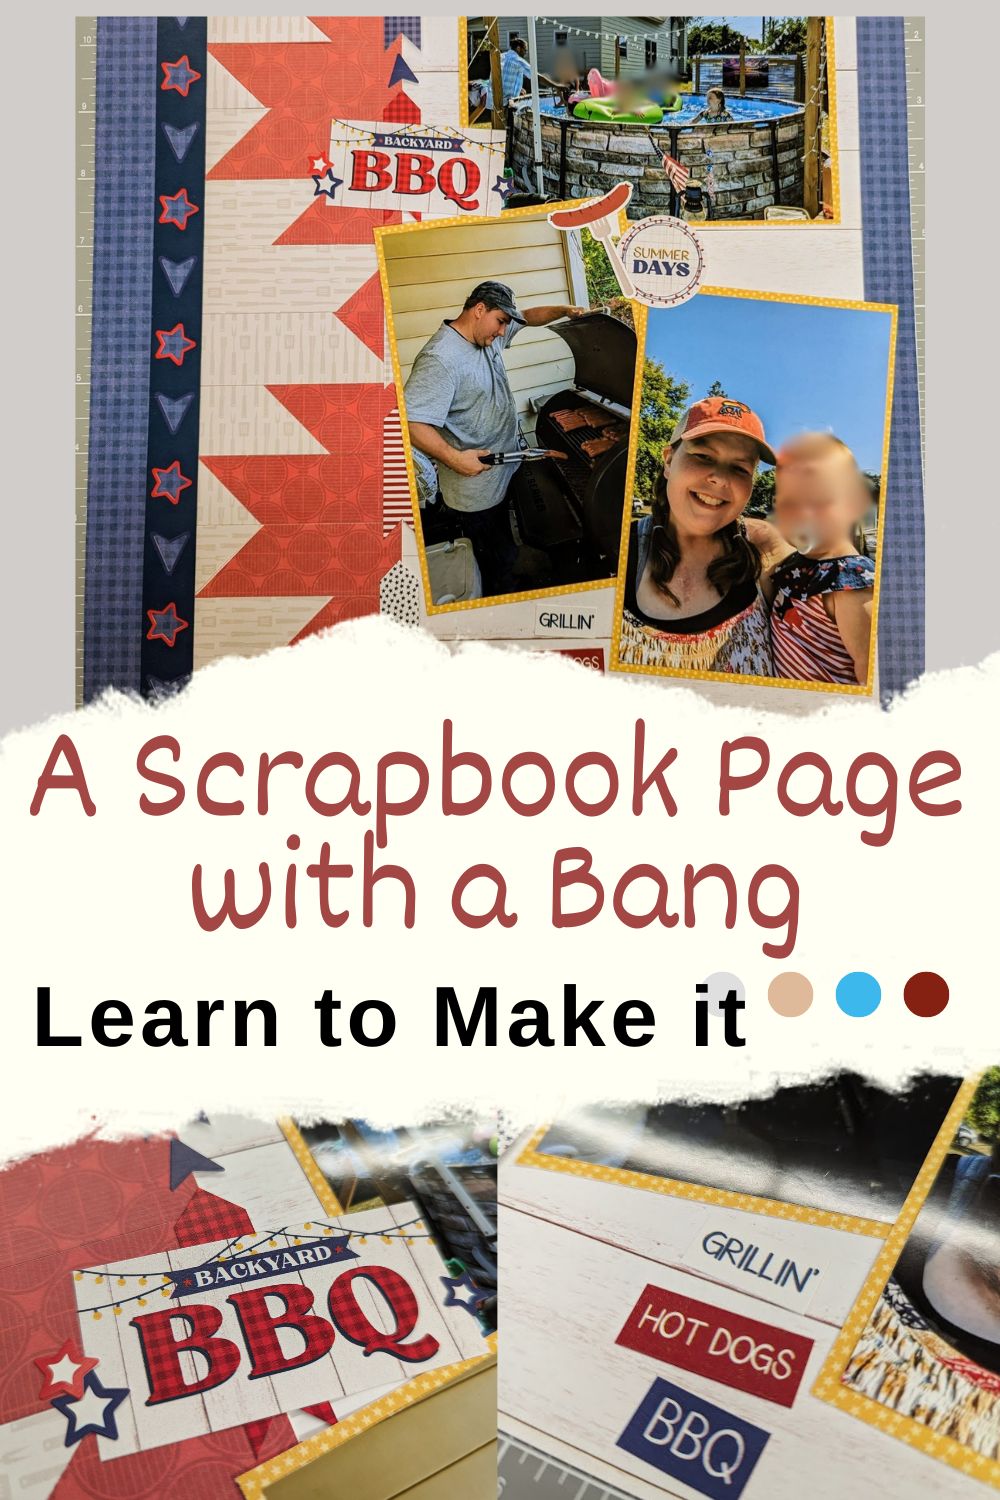
Welcome to challenge 2 of our February Scrappy Virtual Crop! We’ll be creating this booming 12×12 scrapbook layout, inspired by Creative Memories’ blog! Let’s walk through this layout step by step so you can make it too. There are downloadable instructions at the bottom of this post, so be sure to save it for later so you can use it again!
What you need to make this booming 12×12 scrapbook layout
You will need a sheet of designer paper for your “booming” border. Note that you will see both sides of the paper, so use one that you like both sides of. You will also need a couple of 3″ x 12″ pieces of scrap or cardstock to adhere your border pieces to. You won’t be able to see these, so it doesn’t matter what color they are, unless you want to create your border on the edge first. I used a sticker for my border, however.
You will need another designer paper for your “base” sized 12″x12″. This is the color that you will see in the center strip of your layout.
For your skinny pieces on the edge of your booming 12×12 scrapbook layout, you will need 2 strips from the same designer paper. One will be 1 and 1/2″ x 12″ and one will be 3/4″ x 12″.
Pick a coordinating paper or cardstock to mat your photos on. You will also need coordinating embellishments and optional border stickers too. I used the exclusive Backyard BBQ papers and stickers for my layout, which worked great for our 4th of July bash.
For tools, you will need the 12 inch trimmer, adhesive, including the repositional tape runner as this was very helpful when creating the border pieces.
How to create this booming 12×12 scrapbook layout
To start, we will create our border. Start by cutting the designer paper you choose for your border into a 3″ x 12″ strip. Then, cut that strip at every 3 inches, so you have 4 squares that are 3″ x 3″.
Next, you will cut those squares in half to make six triangles.

Take a piece of cardstock or scrap paper sized 3″ x 12″ and adhere your triangles to it, ensuring the opposite color is across from the other color. The design will form peaks, like pictured here:
Once you have all of your triangles adhered to the strip, you will cut it apart at every 1 inch.
*TIP – so your pieces don’t come apart, cut at the seam first, at about, then go back and cut at every inch.
Once your pieces are cut apart, line your pieces back up so they look like you had before cutting them apart, so you can keep track of where to take them from to form your border.
Next, we will arrange our pieces on another 3″ x 12″ strip to make our fun, jagged border. This is the strip you will also punch your border (like the Creative Memories example) on if you want to add that. I did not on my page, as I used a border sticker instead.
To arrange our pieces, you will arrange like this picture:

Essentially, you are taking your pieces and working them backwards.
Adhere those pieces to your border base.
Next take your smaller strips (the 1 and 1/2″ x 12″ and 3/4″ ones), and stick them down on the left and right edges of your layout base, putting the more narrow strip on the right side.
Stick down your created border next to the left strip, then put a border sticker on the seam between them. You can also put a border sticker/border on the other seam of your created border.
Finally, mat your photos and stick them to your layout. Add more embellishments and journal.
Wrapping Up
This layout may feel daunting, and there is some time that is needed to do it well. Just take a breath, take your time, and it will be so worth it! I love how my page turned out. If you have questions, please feel free to comment below!
Don’t forget to post your completed page to the challenge post in my Facebook Group for the February Virtual Crop for Challenge 2 by Thursday, February 29th at 11:59pm for your chance to win a prize!
Download the instructions below so you can make this layout again later!
Downloadable Instructions
If you don’t already have a Creative Memories Advisor, feel free to shop with me at my link below!
Check out more tips and layouts!


*This post contains affiliate links for products that I have used, loved, and want to share with you. If you click on those links, I may get a small commission at no additional cost to you.

