*This post contains affiliate links for products that I have used, loved, and want to share with you. If you click on those links, I may get a small commission at no additional cost to you.

Do you scrapbook your child’s school portrait? I’m always looking for different ways to create a page that still has some texture and fun, while being able to fit in the larger photo without covering all of my work. I came across a similar layout so decided to create a version of this folded scrapbook page!
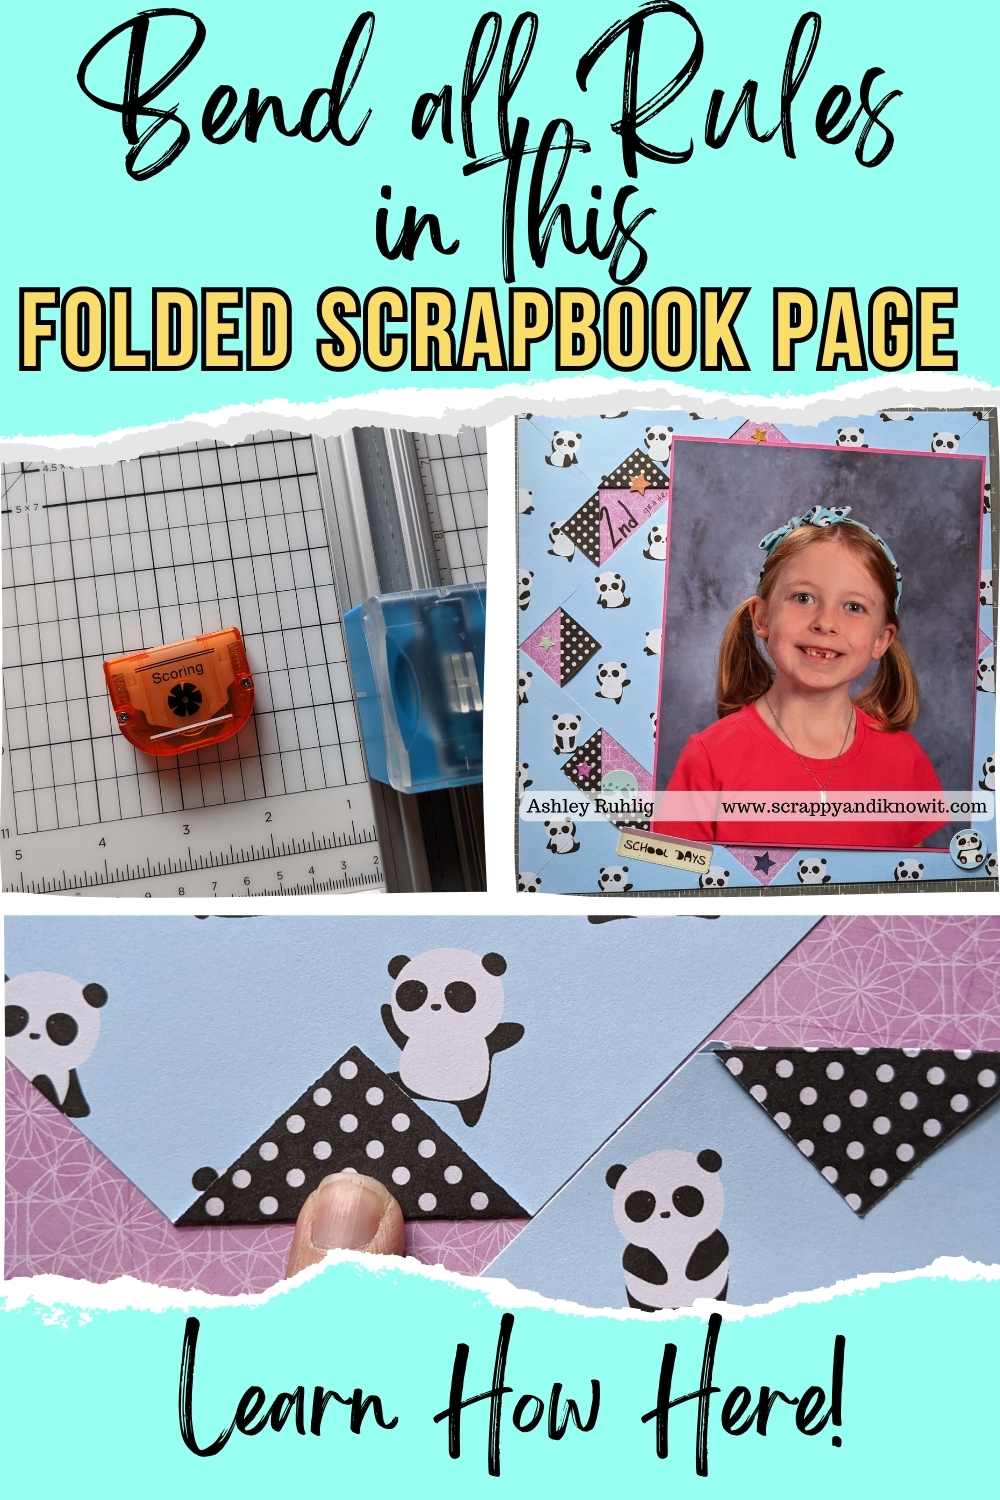
Supplies I Used to Make This Folded Scrapbook Page:

For the base, I used a paper from an older school collection from Creative Memories. They have a fabulous, new school products here, that I actually love even more. I had some panda papers for my panda-obsessed girl from another collection that was not CM (gasp!). I will say though, the quality is not as good. I only bought it for the panda theme as she is into everything panda.
Essential tools I needed to make this layout easier to create were my 13 x 13 mat, which I’m obsessed with, as it helped me line everything up much easier than a ruler. The 12 inch trimmer, which I also can’t live without is very needed in this project, with the scoring blade to make your folds even and easier. I love this trimmer because you can literally change out your blade to any decorative edge you want! Check out all of the blade options here.
How To Create This Folded Scrapbook Page:

Pick your base paper and set it aside. Then select another sheet of paper that you like both sides of that goes with the base paper you chose. Lay it centered on your 13×13 mat and make pencil markings at the 6 inch marks to find the center of each side of the paper you’ll be cutting for your folds.

It’s hard to see in this photo, but you will want to go around to all four edges and leave a mark on that 6 inch measurement, so you know where you are going to cut.
After making your marks, you will then line the paper up on your trimmer, lining up a mark on your line, and turning your paper so you line up the other mark on the next edge to cut a triangle off the corner of the paper. In this photo, I indicated where my 6 inch marks are with a red mark up, so they are easier to see.

Once your marks are lined up, cut across so that you have a large triangle from cutting the corner off. Then repeat until you have done all four corners, lining up your marks as you go. You will be left with 4 triangles, and an 8 1/2 x 8 1/2 inch square.
This square will be your center piece. But set it aside for now, as we will next cut our triangles in half to create more triangles.

For your triangles to create your folded scrapbook page, line them up on your trimmer with the tip centered on the cutting line, and the bottom of the triangle on a straight line to make sure it’s even. Cut each of your 4 triangles in half so you end up with 8 triangles in all.

Now we get to make all of our folds! I used my 12 inch trimmer with the scoring blade to help me create centered, crisp folds on each of the points. For the square, I lined 2 points up roughly at the 5 inch marks, so that the point I was going to fold was past the cutting line just over an inch, then sent my scoring blade over it.
Repeat this process until all 4 points of your square has been scored and ready for folding.

Similarly, fold your “main” point of each triangle. This is the right angle point on your triangle. For those of you who aren’t math/geometry nerds, that is the larger point of your triangle. The other two are way smaller (aka: Acute Angles). The right angle is 90 degrees. You will fold the 90 degree angle and leave the smaller one as they are.
Line the bottom of your triangle on the 2 inch line of your trimmer, sending your right angle (the one you’ll fold) over the cutting line just past the 1 inch mark. Repeat the scoring until all 8 triangles have been folded on their right angles.
Next, line up your 8 1/2 square on your base paper, again, using your 13 x13 mat to find the centers of each side so your turned square is even on all sides. You may even still be able to see the marks you made from your 6 inch lines, which really helped me find the centers. I centered the square and adhered it down in the middle before sticking down my folds so it was easier to center.


Once you adhere your square to your base, you can then go around and stick down your corner folds by adhering them so they stay folded down.
Next, to keep creating your folded scrapbook page, we will place our triangles. Depending on what pattern of paper you used you may want to line your triangles up so that the pattern matches back up with your square, but if it won’t be super obvious, you can just place each triangle wherever. I enjoyed putting my paper back together like a puzzle.

Adhere down your folds so the points stay folded. Then start taping the triangles down on your base so that they line up with your square. They began and ended at that 6 inch mark, so again, your 13 x 13 mat will come in very handy here! Continue placing your triangles down until you have them all placed and lined up, leaving you with a page like this:


Now that you have your base completed, mat your photo(s) with a complimenting color, and stick them down where you want them on your page. Embellish, journal, and you’re done with your folded scrapbook page!
No matter what theme you’re going for, just change your papers to match what your photo(s) call for. I debated also doing a Christmas page with this layout as well, which I think will also look really neat.
Post your completed page in my Facebook group or in the comments of this blog post! Summer Scrappy Campers, post it in the album of the coordinating challenge for this layout so you can get your drawing entries!


