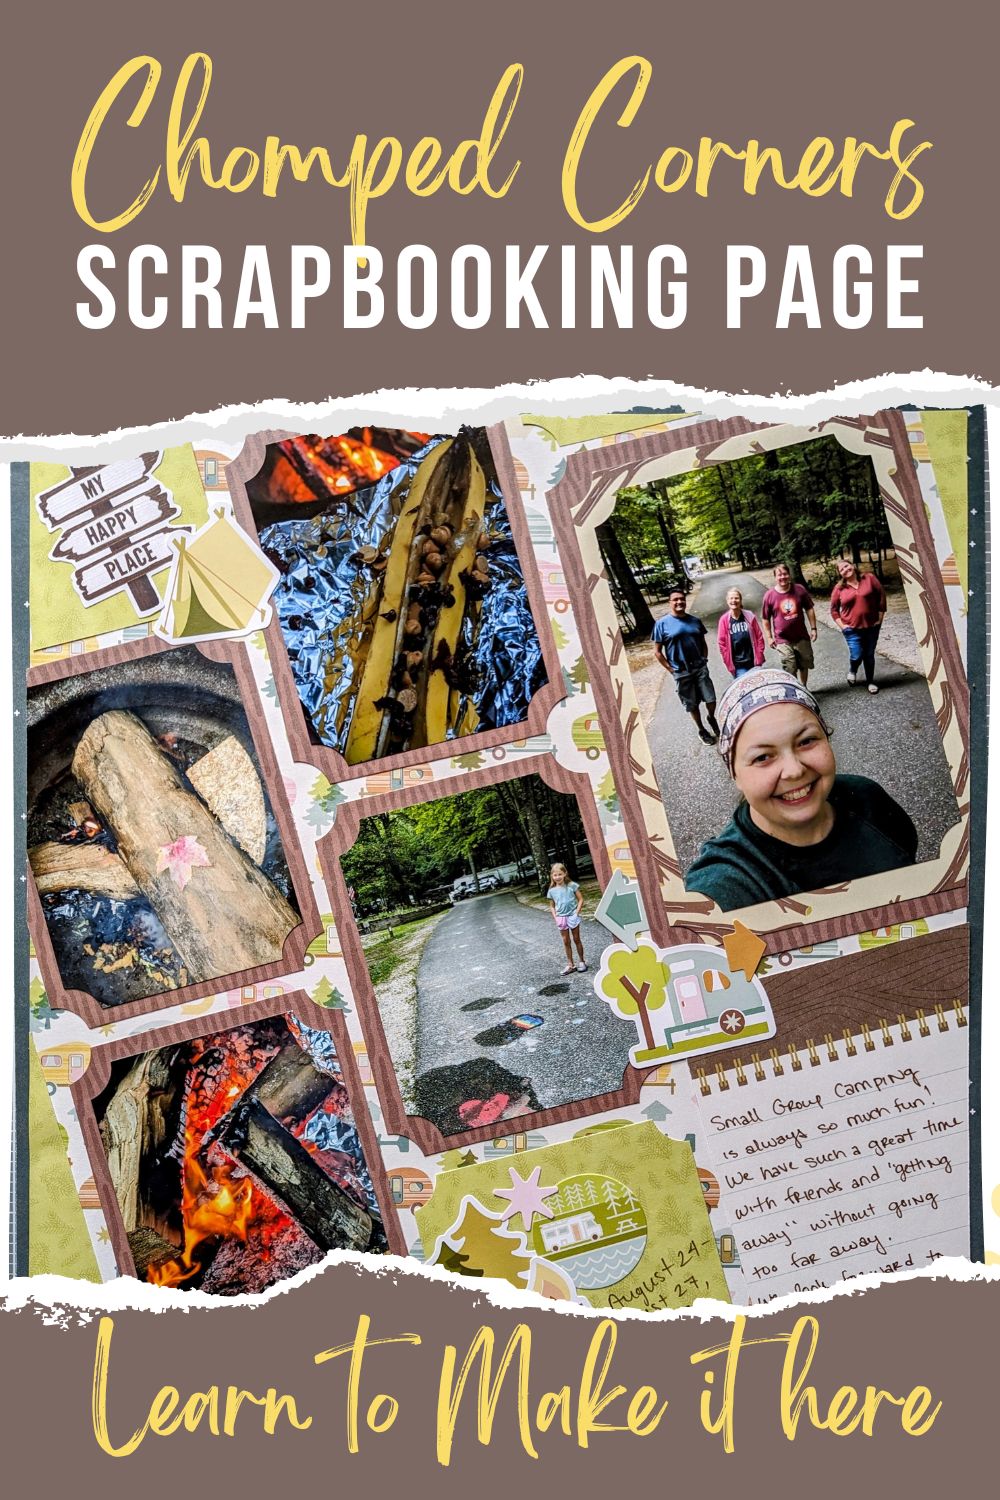
We camp all the time in Michigan summers. I’m always looking for ideas of how to make a fun scrapbook layout for my recent trips, and found this one from the Creative Memories blog. It uses a cool technique by chomping out the corners to create a unique, “ticket” layout. You can read here how I put it together and download printable instructions below to hang onto for the future!
What You Need To Make This Fun Scrapbook Layout
You will need to select a collection or coordinating papers to get your layout together. This was the hardest part for me and is what took the longest. I opted for the Set Up Camp collection from Creative Memories, and I truly love all of the camping collections they have brought out.

The 2-Way Corner Rounder from Creative Memories is pretty essential for this layout as well, which is what allows you to create those rounded-in corners for the “ticket” look of your mats/photos. I highly recommend you have this tool in your toolbox as I use it all the time!
You will also want your other essential tools, like adhesive and your 12-inch trimmer to help you get this layout together.
Be sure to also have some stickers, embellishments and even some mats that go with your papers to help bring your page together!
How This Fun Scrapbook Layout is Made

I began by “gutting” my 12″ x 12″ frame base so I could save paper. Since all you see from the base is the outer edge, you can cut around the center to leave a 1-inch wide frame. You only have to do this if you want to though. Then set your base/frame aside.
Next, you will create your mats which you will put your photos on, as well as your journaling mat if you are going that route. As you can see, I used a larger photo as well, so I created a larger mat too. You will need 5 mats sized to 3-1/2″ x 4-1/2″, and a larger one at 5″ x 7″ for your larger photo/journal mat.

Trim your photos to 3″ x 4″. You can opt to make all of your photos this size, or you can leave one larger like mine. My larger photo is actually closer to a 3-1/2″ by 5-1/3″ because I use true digital size and needed to slim it down for the mat underneath. You can get flexible with it, or stick to the sketch in the downloadable instructions.
Next, you will want to use your 2-Way Corner Rounder to “chomp” out your corners for each of your mats and photos. Adhere your photos to their mats.

Cut a piece of paper to 11-1/2″ x 11-1/2″ for your middle layer, that you will stick all of your mats and photos to. Stick your matted photos to this sheet at a slant, letting corners hang off the edge where they naturally fall. Trim off the overhang.
Add any pieces to fill your “gaps” where it looks like more “tickets” need to be on your page. You can use other coordinating papers for this, or scraps from one you have already used. I simply used a piece of coordinating scrap and used whatever I trimmed off to fill spots. Be sure to also “chomp” the corners that show for those too.

Once you have your edges all trimmed evenly of any excess from your mats and photos, you can go ahead an adhere your entire sheet to your original base/frame.
Finally, you will want to add some embellishments, including a title for your fun scrapbook layout. Add some journaling and you are done!
Even though this was originally a layout intended for an amusement park theme, I thought this turned out very cute for my camping layout! I hope you can create a cute page from this layout idea too!
Download Instructions to Print
Wrap Up
If you don’t already have a Creative Memories Advisor, I would love to be yours! We have a lot of fun in my Facebook Group, so if you are on Facebook, be sure to request to join my group. You can also shop and check out more of what CM has to offer at my site by clicking the button below.
More Tips and Layouts
*This post contains affiliate links for products that I have used, loved, and want to share with you. If you click on those links, I may get a small commission at no additional cost to you.


