
If you have some Christmas layouts to do from this past December (or many, many Decembers ago), you can give this merry, wreath page a chance! Follow me as we walk through how to create this together, originally from the Creative Memories blog!
What You’ll Need:
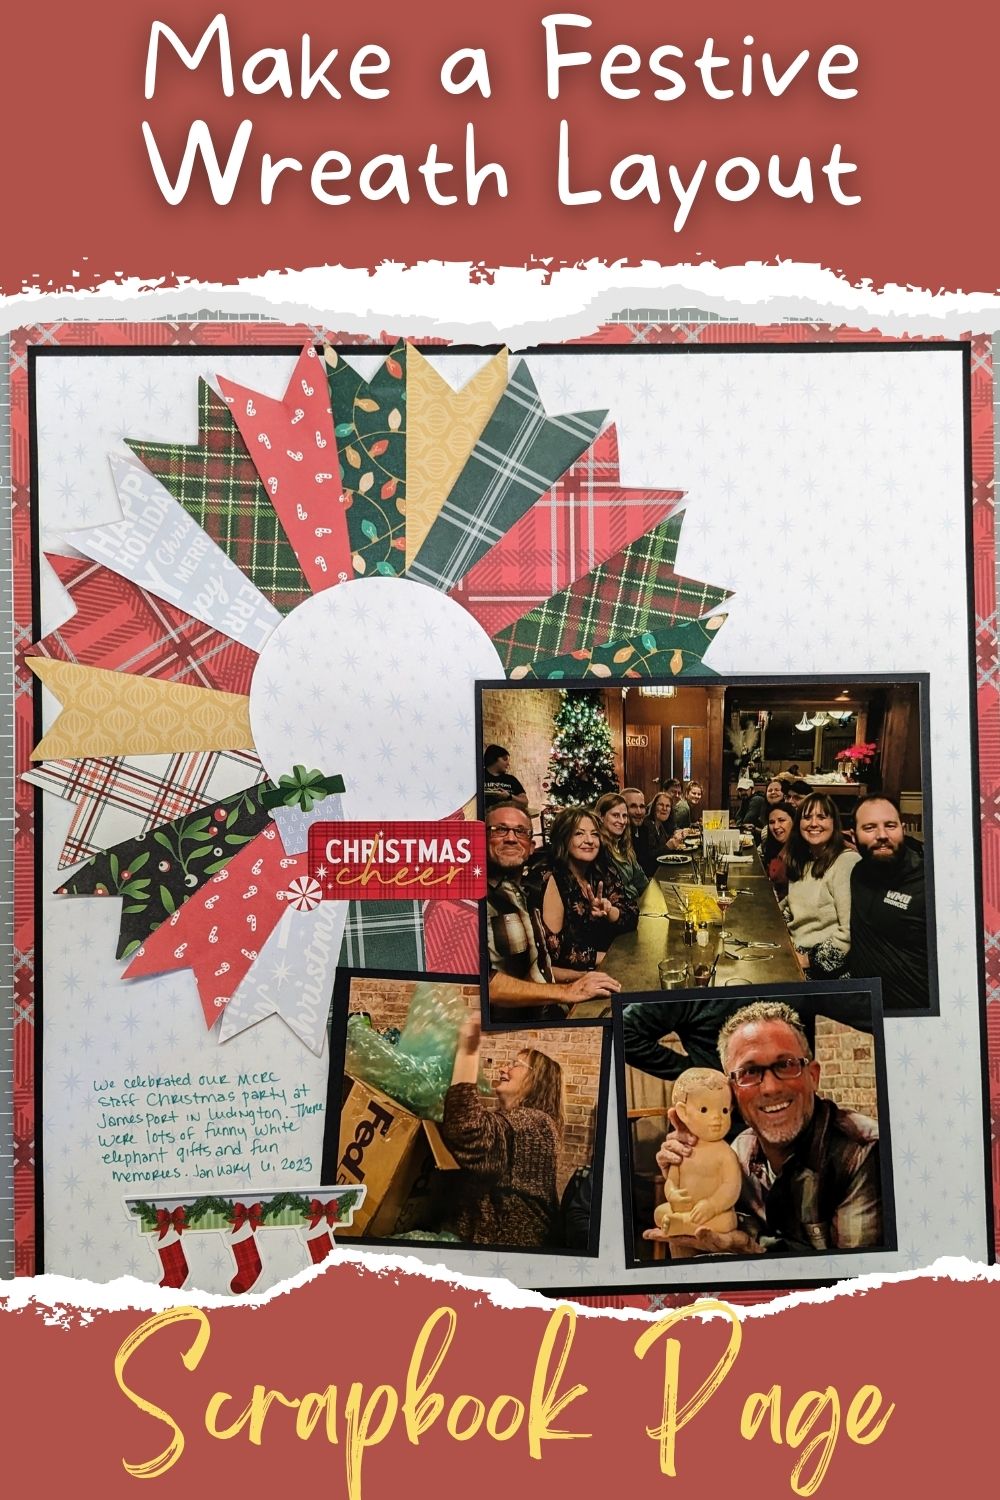
To create this festive page, I used various Creative Memories Christmas papers and embellishments, mostly from the most recent “Christmas Cheer” collection.
For tools, you will want to have your 12 inch trimmer for creating those smooth cuts. I highly recommend the one from Creative Memories! You will also need some sort of way to create a circle, like the Circle Cutter or Custom Cutting System with Circle patterns to create a 3ish inch circle and an 8-3/4″ circle.
You will also want either the Square punch or a simple pair of scissors to help you make your banner pieces on your wreath, and the Repositional Tape Runner to adhere your pieces down.
How to Create This Page:

Begin by creating your layers for your base. Trim your middle paper/cardstock to 11-1/2″ x 11-1/2″. You can choose to trim and mat your photos from the center of this solid paper if you would like to save paper. (That is what I did.) You could also do this with your 12″x12″ base if you prefer that color as well. Just be sure to leave enough of a frame for your layer to show from behind the one on top of it.
Next, trim your top layer to 11-1/4″ x 11-1/4″. Adhere both of your layers to your base.
To make your wreath, begin by cutting a circle on a scrap piece of cardstock, using the inside track of your Jumbo Circle Pattern of your Custom Cutting System and your Red Blade. Your circle will be about 8-3/4″ wide. (You can also use your Circle Cutter, set to that size.)

Cut several, random strips of paper sized 5-1/2″ x 1″ to create the pieces of your wreath. I used 15-18 pieces, and it will depend how close together your place your pieces.
To create the “notch” at the end of each of your pieces, you can use a Square punch, angled on the end of the strip to create the right punch. (Turn over your punch to eyeball it from the bottom opening to see where your paper is.)
What I did though, was simply lightly fold my end in half and angle scissors from the center to the corners to create the perfect banner edge. Just repeat for each of your pieces.
Start lining your pieces up on your circle, layering from the bottom and slightly toward the top to create the wreath look. Keep in mind that you don’t have to necessarily put pieces where your photos will be.
Once you like where they are, start adhering them down, using the Repositional Tape Runner. It will come in handy if you need to move your pieces.
Once you have your pieces stuck down, you will need to create the “center” circle for your wreath. The original directions from Creative Memories say to use your cutter to cut a circle out of the middle of your wreath. I had a hard time with how thick my wreath was, so I took my Circle Cutter and cut a 3″ circle from the base paper where the wreath was going to cover it anyways. You can also use your Custom Cutting System and your largest circle of your pattern trio (not the Jumbo Circle), and your Blue Blade to create your circle.

Adhere your 3″ circle, which matches your base paper, to the center of your wreath. Adhere your wreath to your base, covering the circle you cut from it.
If you haven’t done so already, trim and mat your photos. The photos in this layout are 2 at 3″x3″, and one at 5-3/4″ x 3-3/4″. You can do what is best for your photos and layout though. Adhere those down around your wreath.
Embellish with coordinating Christmas stickers and embellishment pieces. Then journal!
Wrapping Up
I hope this is one you will like to add to your Christmas layouts options for future pages! While there is some tedious work that goes into this layout, it comes together beautifully, and I love how my page turned out! Other than Christmas layouts, could you see yourself using this for any other layout themes? Comment below!
If you don’t already have a Creative Memories Advisor, I would love to be that person for you! Check out all of the awesome tools and unique products Creative Memories offers, whether you are looking for something for your Christmas layouts, baby layouts, school layouts, vacation layouts, and more! You can see everything at my site at the button below.
Download Instructions to Add to Your Christmas Layouts Options:
Check out more layouts and tips!


*This post contains affiliate links for products that I have used, loved, and want to share with you. If you click on those links, I may get a small commission at no additional cost to you.

